


 (National Geographic Reference Map)")
 (National Geographic Reference Map)")
National Geographic World Maps
Setting the highest standard for cartographic excellence
Since publishing its first World Map in 1922, National Geographic has excelled in the art and science of mapmaking. National Geographic’s unique cartographic style is defined by beautiful color palettes, proprietary typefaces, hand-drawn shaded relief, and carefully researched content. The attention to detail and accuracy is what really sets National Geographic apart from other mapmakers. Each World Map has been carefully compiled based upon the latest data sources and independent verification of disputed boundaries, borders, and territories. When this level of research is combined with great design, the result is the best line of World Maps currently available.
Wall Map formats
- Paper: High-quality matte poster stock, printed in the USA
- Laminated: Plastic gloss lamination increases durability
- Poster size: 24″ x 36″, designed to fit precut poster frames
- Standard size: Approximately 30″ x 46″
- Enlarged size: Approximately 48″ x 73
- Mural size: Approximately 77″ x 110″, comes as three panels that mount using wallpaper glue
Four distinctive styles
|
|
|
|
|
|---|---|---|---|
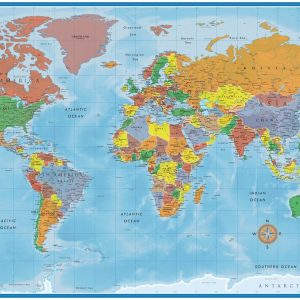
ClassicThe Classic style is the traditional National Geographic design that has been featured in so many of the maps produced as supplements in the National Geographic Magazine over the years. Highlights include blue oceans with bathymetric contour steps, brightly-colored tint bands along country borders, and hand-drawn shaded relief. This style contains the highest level of detail. This map is presented in the Winkel Tripel projection, which minimizes distortion and creates a very recognizable shape of the Earth. |
ExecutiveThe Executive style is a perfect match for home and office décor as it pairs nicely with wood and leather furnishings. Featuring an antique, earth-tone color palette combined with up-to-date cartography, this has become National Geographic’s bestselling World Map design. The subdued beige of the oceans is enhanced with bathymetric shading showing underwater terrain features. This style contains the highest level of detail. This map is presented in the Winkel Tripel projection, which minimizes distortion and creates a very recognizable shape of the Earth. |
DecoratorThe Decorator style is the brightest of the National Geographic World Map designs and is perfect for kids’ bedrooms, classrooms, and those who want a pop of color on the wall. Featuring solid colors filling each country, pale blue oceans with bathymetric shaded relief, and a black border around the whole image, this World Map is beautiful and easy-to-read. This style contains the second highest level of detail. This map is presented in the Winkel Tripel projection, which minimizes distortion and creates a very recognizable shape of the Earth. |
ModernThe Modern style is the minimalist amongst National Geographic’s World Map designs. It simply presents the beautiful shape of the Earth’s land mass, in solid black, sitting on top of slate blue/gray oceans. This map also includes country names, borders, and major cities in contrasting white. This design is compatible with modern home and office décor, pairing well with glass and metal furnishings. This style contains the lowest level of detail. This map was developed using the Times projection, which features minimal distortion in the equatorial regions of the Earth. |
 (National Geographic Reference Map)")
 (National Geographic Reference Map)")
 (National Geographic Reference Map)")
 (National Geographic Reference Map)")
 (National Geographic Reference Map)")
Sonona –
This is the second time we have purchased this map, wallpapered it with wallpaper glue (from Laura Ashley), and built a chair rail frame around it painted an elegant dark brown. I am a Geography teacher and use it to teach my little ones to identify the continents and oceans… and sometimes, teasingly ask, “How many countries end with ‘-tan’?” It’s a fabulous and becoming backdrop for an adventure or transportation themed boys’ room. This mural comes in three large pieces. When it hangs heavy with wallpaper glue, it will stretch, so the faster you can get it onto the wall, the better the city/country names will line up. My previous map aligned better than this one (also from Nat Geog). This one matches at the top but not so much at the bottom… so if you are hanging it really high up, then align it from the bottom where you will see errors more clearly. When the wallpaper glue dried, the bubbles disappeared, so don’t be tempted to prick them with a pin when it’s wet. This particular mural has a more elegant coloring than our previous sepia one which had more reddish brown hues. TAKE NOTE that the dimensions given are misleading because they are the sum total of the three sheets, but when you overlap them so that the geo-political lines and country names correctly align, the total width (left to right) is less, so don’t DRAW guiding lines on your wall based on the given dimensions because you’d have to paint over them (like us).
C D –
Whew…Putting this up was not as easy a task as you reviewers let on! You all must be professional wallpaper hangers!1. Measured out area on wall. Since study wall was 125″ long this 117″, 3 panel map covered almost the entire wall. Also hung a weight line (thumbtack, thread and washer) from ceiling to adjust first (middle) panel.2. Use primer (Roman Pro-909, Home Depot) on a semi-gloss (eggshell finished) wall. Takes about 60 mins to dry to touch.3. Next, laid out middle panel and applied wallpaper paste (Roman Universal Wallpaper Paste GH-57, Home Depot). The directions said clay based put didn’t find any when looking that day. GH-57 (dries in 45 mins) comes in quart containers and covers 45 sq ft. I only bought one, but should have bought two.4. We didn’t apply enough paste to the first panel (especially around the edges) so it wouldn’t stay on the wall. We had to pull it down and apply another coat, focusing on the edges and hang it back on the wall. It stayed this time and we used a wet sponge and wallpaper roller to push the air bubbles out. The sponge also wiped up paste that came out from around the edges as we worked it on the wall.5. Next we hung the left and right sides. Definitely went with the planning factor “P” for plenty when applying paste to these panels. This is why I wish I had bought to containers of paste because I barely had enough to finish. There are overlaps on both sides that need to be lined up. If you don’t pay attention to this Russia will be spelled Russsia.6. Spent about 10 mins just rolling it on the wall and working some small air bubble. Used a q-tip to apply what little paste was left to the edges to make sure they stayed down.7. Stood back and patted ourselves on the back for a job well done. Hoped it would still be on the wall in the morning.8. Woke up and it was still on the wall!
Gus –
We have a very large room and originally planned on purchasing one of the larger maps. It is not a Gail-Peters map -however, this one was a better world representation than most, and also allowed us to build a large frame with built-in lighting around the map that matches our book shelves. Good geographic detail and place names. Since the wall had a ledge at about 6.5 foot height, we actually mounted the map onto a plywood base that we had fastened onto the wall.. We used store bought wall paper adhesive ( about $10 at Home Depot) and it took my son and I about 30 minutes to hang the three panels. We had to peel one partially off at one point to align it a little better…but that was no big deal. We didn’t start in the middle as recommended (would have been easier) and simply used a 6 foot level to keep things level and plumb. Two people make the job super easy; one person would will make the job tedious and a little cumbersome. Nevertheless, one person can do it. I started on my own with the first panel and my son happened to come in just as I had it on the wall, the other two panels were easy peasy.
Shayna –
I love this map and how huge and detailed it is. I will say that it’s so large there’s no way you can put it up by yourself. I tried and struggled for a long time. I also couldn’t find a place in my house to put in above my couch like I wanted to because of it’s large size. But that’s okay because there’s an area of my home office that I can put it.I’m a world traveler and I wanted to put up a map and start putting in map tacks of every place I’ve been too to track my progress of travel. This is just perfect for doing that or for doing wall murals in a kids room or other area of the house. The color, size, detail, and thickness of the paper is all completely perfect. I loved how thick it was because I feel it’s sturdy and prevents being torn. The only thing I wish I could change about it is I wish it was one solid piece instead of 3 pieces. Even with help from someone else you have to perfectly line up the words on the map just right. It will take patients to do it without any flaws.I’m sure there’s a reason they split it into multiple pieces maybe because it was ripping in the past with how heavy the material is and the fact that people more than likely were trying to pin it up by just the four corners. But I’d prefer if they gave people the option of purchasing it as one piece for more money or as three pieces for the normal price.
Am –
These maps are HUGE! I didn’t actually wallpaper them, but mounted them in several large frames.They are made out of a plasticated paper that does not not take a lot of effort to roll out. It doesn’t fold and crease super easily, but you do need to be careful.The maps are so huge that the details to them aren’t so important – but there is some general “pixelation” to it from the images being blown up so large. The words and countries are clear, but some of the images that mark elevation, or the dotted lines seen across the map, are pixelated. It doesn’t take away from the overall splendor of the maps, but it is something that may bother you.